Shopping Cart
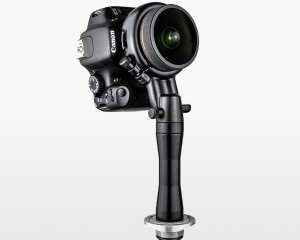
0 item(s) - 0.00€Ultralight Panohead for Samyang 7.5mm MFT (+4°)
*Delivery time estimate is for shipments within Germany. For other countries the delivery time will be different.
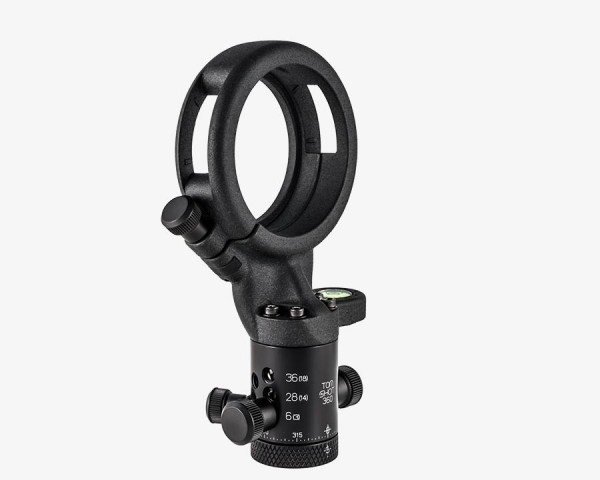
- This model is compatible with the Samyang 7.5mm MFT Fisheye Lens
- This model has a +4 degree tilt upward
- NEW modular design! Possible to change ring & add optional accessories
- This product is Set 1, includes one lens ring & one rotator
- Lightweight & compact (145 to 160mm height, 196 to 216g)
- 12 different click stops: 3, 4, 5, 6, 7, 8, 10, 12, 14, 16, 24, 32
- (Please note that the product images show an older design with different numbers of clicks compared to the current design. The images are for illustration purposes only. 18, 20, 28, 36 clicks shown in the images are not available on the most current design. The current number of clicks are selected for the most useful combinations while fitting within a compact size.)
- Viewport for visible aperture and focus settings
- Some lenses allow adjustments to aperture & focus, please check the specifications for which lenses are possible
- Shoot single row in 3 to 8 photos, the number depends on lens & camera sensor size
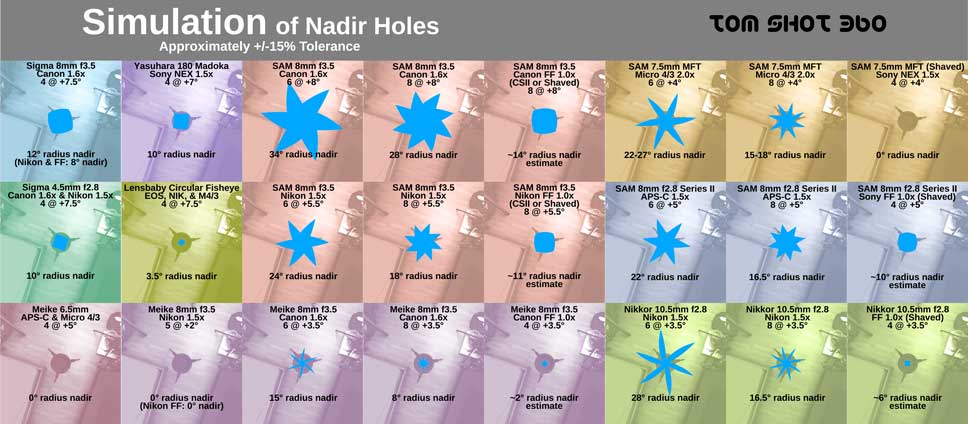
- Capture the sphere including full zenith, with a minimal sized nadir hole
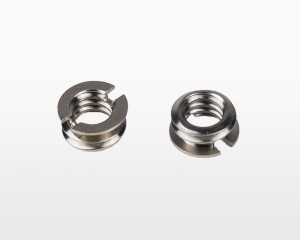
- 3/8"-16 tripod thread under the rotator, with a 1/4"-20 adapter included
- Dettachabe ring has a 1/4" threaded insert, & can be used stand-alone with monopod
- Ring is 3D printed with strong polyamide nylon
- Rotator shell is made from 6082-T6 aluminum & 303 stainless steel internal click cylinder
- Large circular bubble level with extra high sensitivity
- Lenses, cameras, and software are not included
- Optional modular accessories are not included (e.g. quick release clamp, plate & rails)
- Made in Germany
This version is for use with the Samyang 7.5mm MFT Fisheye Lens, which also goes by the brands of Rokinon, Walimex Pro, and Bower. The lens has a mount for Micro 4/3 cameras, however you can also adapt it for use with Sony E-mount APS-C sensors if you use a mount adapter (not included) and you shave the lens hood. A panorama can be completed with a Micro 4/3 camera in 6 shots around and 1 hand nadir shot (zenith optional), but I recommend 8 shots around. With an APS-C camera in 4 shots and 1 optional hand nadir.
The focus and aperture rings are adjustable when the lens is installed in the panohead. Lens hood shaving is done by you at your own risk.
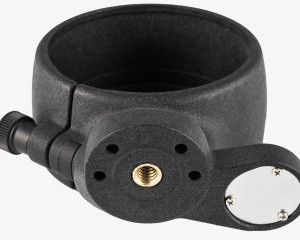
The Tom Shot 360 Ultralight Panohead is compact, lightweight, and easy to use for shooting 360° x 180° spherical panorama photos. Originally designed for extended hiking and bicycle trips, the new modular design with click stops is adaptable for use in multiple scenarios, and makes it possible to change the lens ring for mounting different fisheye lenses, and mix different combinations of optional accessories for standard, quick release, or stand-alone use.
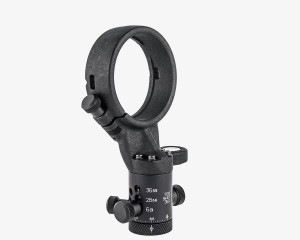
The lens ring has fixed positions for the lens for horizontal rotation around the no-parallax-point, at the horizon for the minimum number of shots to complete a panorama. The ring is available in different versions. Each ring version is designed to fit only one specific model of fisheye lens, and cannot be used for other models of fisheye lenses. Before adding the product to the shopping cart, please check that the selected ring is compatible with your lens.
This product, Set 1, includes the lens ring and rotator. Other accessories such as the quick release clamp and plate are optional and not included. The modular accessories are not compatible with the older Classic uni-body versions from before 2018.
This system makes it possible to mix different combination of parts.
We recommend buying a Set 1 with a complete pair of ring and rotator instead of purchasing the ring separately, and then adding optional accessories to Set 1. This is because the bubble level is glued centered onto the ring while attached to a specific rotator. Rotators and clamps have up to 0.1mm of level difference from one side of the top surface to the opposite side, and the bubble level is extremely sensitive. Attaching a ring to a different rotator than the one that it was originally assembled on, or to a clamp, could cause the bubble to be appear off-centered near the edge of the black centering circle. It is still usable, but you will need to take notice of the small off-centering of the bubble.


Clicking on the images below will open a new window in your browser.
The YouTube video demonstrates the installation and operation of the Classic panohead for the Sigma 8mm f3.5 lens. However, the installation of the lens is similar to the newer modular design. An updated video for the new modular system will be forthcoming in the near future.
As shown in the video, lenses that have a protruding MF/AF switch (such as Sigma 8mm f3.5 for EOS) need to be matched to a slot on the lens ring for installation. One of the methods in the video for setting the focus is to use a piece of tape, however I do not recommend using tape because it will change the diameter and fit of the ring around the lens. But if you must use tape then make sure to use a narrow, short, and thin strip of tape not wider than 15-20mm, and not longer than 50mm. Wider and longer pieces of tape may prevent proper installation.
The lens ring is printed with Selective Laser Sintering (SLS), which is a method of producing a physical duplicate of a 3D model by using a laser to fuse together 60 micron (average size) particles of powder, in typically 0.12mm layers. The material is a strong Polyamide 12 nylon (PA2200 Material Data Sheet). SLS printing produces the most functional printed parts because of its accuracy (0.2mm tolerance) and durability of the material, when compared to other types of printers such as FFF/FDM (less accurate, rougher surface) and SLA printers (very brittle).
When the SLS parts come out from the machine, the surface is white and like sandpaper. The parts are then smoothed in a tumbler with ceramic media for several hours, then colored in a vat of black dye and washed.
SLS 3D printing has a high unit cost, but in addition to the better part functionality, it can produce complex, large and thick uni-body shapes that cannot be made with other conventional technologies such as plastic injection molding. SLS technology also allows for quick production with low startup cost, and designs can be changed at no additional cost, which is better for more custom and small production runs. Whereas plastic injection molding has a low unit cost, but has a very high startup cost because the mold forms may cost several thousand dollars and cannot normally be changed, meaning that a change in design requires new mold forms to be produced, making it more suitable for mass production runs with no changes. Injection molding also has problems with thick and large parts.
| Lens Model | Mount Type | Ring Tilt | a. M4/3 Projection b. Orientation c. Shots (H + N) d. Size (Xs: yMP) e. Nadir Hole | a. APS-C Projection b. Orientation c. Shots (H + N) d. Size (Xs: yMP) e. Nadir Hole | a. FF Projection b. Orientation c. Shots (H + N) d. Size (Xs: yMP) e. Nadir Hole | (A) Aperture (F) Focus | Insert Direction |
|---|---|---|---|---|---|---|---|
| Sigma 8mm f3.5 | EOS, Nikon, Sigma | +7.5° | - | a. Part Circle b. 4 + 1 c. Portrait d. 16s: 46MP (1.5x) d. 18s: 57MP (1.6x) d. 24s: 69/76 (1.5/1.6) e. 12° / 8° (1.6/1.5) | a. Full Circle b. 3 (4) + 1 c. Portrait d. 24s: 29MP d. 36s: 44MP d. 51s: 61MP e. 8° | (A) Electronic (F) Fixed | Front of ring |
| Samyang 8mm f2.8 Series 2 | Sony E, Samsung NX, Fuji X, (EOS-M*) | +5° | - | a. Full Sensor b. 6 (8) + 1 c. Diagonal d. 16s: 64MP d. 24s: 96MP e. 22° / 16.5° (6/8) | a. Part Circle b. 3 (4) + 1 c. Portrait (shaved) d. 36s: 57MP d. 42s: 67MP e. ~10° | (A) Accessable (F) Accessable | Front of ring, remove rear lens cap |
| Samyang 7.5mm MFT, f3.5 | M4/3, Sony E | +4° | a. Full Sensor b. 6 (8) + 1 c. Diagonal d. 12s: 55MP d. 16s: 73MP d. 20s: 91MP e. 22-27° / 15-18° (6/8) | a. Part Circle b. 4 + 1 c. Portrait (shaved + adapter) d. 16s: 41MP d. 24s: 61MP e. 0° | a. Full Circle b. 3 (4) + 1 c. Portrait (shaved + adapter) d. 36s: 39MP d. 42s: 46MP e. 0° | (A) Accessable (F) Accessable | Front of ring, remove rear lens cap, remove adapters |
| Samyang 8mm f3.5 CSI & CSII for Canon | EOS, EOS-M, Sony Alpha & E, Samsung NX, M4/3, 4/3, Fuji X | +8° | - | a. Full Sensor b. 8 + 1 c. Diagonal d. 18s: 79MP (1.6x) d. 24s: 105MP (1.6x) e. 28° | a. Part Circle b. 3 (4) + 1 c. Portrait (Shaved or CSII) d. 24s: 38MP d. 36s: 57MP d. 51s: 79MP e. ~14° | (A) Fixed (F) Fixed | Front of ring |
| Samyang 8mm f3.5 CSI & CSII for Nikon | Nikon, Pentax | +5.5° | - | a. Full Sensor b. 6 (8) + 1 c. Diagonal d. 16s: 64MP (1.5x) d. 24s: 95MP (1.5x) e. 24°, 18° (6/8) | a. Part Circle b. 3 (4) + 1 c. Portrait (Shaved or CSII) d. 24s: 38MP d. 36s: 57MP e. ~11° | (A) Accessable (F) Fixed | Front of ring |
| Meike 6.5mm | EOS-M, Sony E, M4/3, Fuji X | +5° | a. Part Circle b. 4 + 1 c. Portrait d. - e. 0° | a. Full Circle b. 3 (4) + 1 c. Portrait d. - e. 0° | - | (A) Accessable (F) Fixed | Front of ring, Remove rear lens cap |
| Meike 8mm f3.5 Canon EOS | EOS | +3.5° | - | a. Full Sensor b. 6 + 1 c. Diagonal d. - e. 15° (8°@8x) | a. Part Circle b. 3 (4) + 1 c. Portrait d. - e. ~2° | (A) Accessable (F) Fixed | Front of ring |
| Meike 8mm f3.5 Nikon | Nikon, Sony E, Fuji X | +2° | - | a. Full Sensor b. 5 + 1 c. Diagonal d. - e. 0° | a. Part Circle b. 3 (4) + 1 c. Portrait d. - e. 0° | (A) Accessable (F) Fixed | Front of ring |
| Nikkor 10.5mm f2.8 | Nikon | +3.5° | - | a. Full Sensor b. 6 (8) + 1 c. Diagonal d. 16s: 90MP (1.5x) d. 24s: 134MP (1.5x e. 28°, 16.5° (6/8) | a. Part Circle b. 3 (4) + 1 c. Portrait (Shaved) d. 24s: 54MP d. 36s: 81MP e. ~6° | (A) Electronic (F) Accessable | Front of ring |
| Yasuhara Madoka 180, 7.3mm f4 | Sony E, Fuji X | +7° | - | a. Full Circle b. 3 (4) + 1 c. Portrait d. 16s: 18MP d. 24s: 27MP e. 10° | - | (A) Fixed (F) Fixed | Back of ring |
| Lensbaby Circular Fisheye, 5.8mm f3.5 (Classic Panohead Only) | EOS, EOS-M, Nikon, Sony Alpha & E, Samsung NX, M4/3, 4/3, Fuji X | +7.5° | a. Part Circle b. 4 + 1 c. Portrait d. 12s: 20MP d. 16s: 27MP d. 20s: 33MP e. 4° | a. Full Circle b. 3 (4) + 1 c. Portrait d. 18s: 20MP (1.6x) d. 24s: 27MP (1.6x) e. ° | - | (A) Accessable (F) Fixed | Front of ring |
| Sigma 4.5mm f2.8 (Classic Panohead Only) | EOS, Nikon, Sigma | +7.5° | - | a. Full Circle b. 3 (4) + 1 c. Portrait d. 18s: 20MP (1.6x) d. 24s: 27MP (1.6x) e. 10° | - | (A) Electronic (F) Accessable | Front of ring |

To use the Samyang 7.5mm MFT fisheye lens with a Sony E-mount camera you will need to shave the lens hood, remove shims, and attach a Micro 4/3 to Sony E-mount adapter. The modifications are very easy to make, and takes about 45 minutes to complete. It is done by you at your own risk.
Remove the black metallic label ring. The ring is backed with adhesive tape, pry gently. Then remove the three screws which are revealed, and the hood will come off. You need to completely remove the short shades of the lens hood, and shave about 3mm off the top and 1.5mm off the sides of the large shades. The large shades are needed to attach the lens cap. Draw a line along the intended cuts, clamp ($3) the hood to a table, and use a hack saw ($4) to cut a little bit less than intended. Use a nail file ($1) to remove the rest. Check intermittently with your camera to see if you have shaved enough of the hood so that you no longer see it in the image. Clean off the dust each time before reattaching.
The thickness of the Micro 4/3 to E-mount adapter could vary slightly than the needed 1.25mm thickness. If the adapter is thicker, then the lens is pushed forward slightly out of focus and you need to remove shims to bring it back. My adapter is 1.60mm thick, which is 0.45mm more than needed. Unscrew and detach the mounting plate on the back of the lens. Inside you will find multiple adjustment shims. My lens has 2 shims, 0.3mm and 0.05mm thick. You may find more in your lens. Remove one at a time until focus to infinity is achieved. Removing both shims was best for me. Focus to infinity (hyperfocal distance) may change and is usually achieved when the focus ring is set slightly below the infinity marking. In case you need to replace the screws attaching the lens mount, they are M1.6x9mm with a 2.5mm diameter flat head machine screws, which you can find on online micro fastener shops.
You need an adapter to attach the MFT lens to the Sony E-mount. The adapters from eBay ($15) may be machined slightly wider than necessary and the lens sits a little loose inside the adapter. To make a tighter fit, insert the end of a screw driver into the slot inside the adapter mounting tabs to widen it. Do it slowly and in increments, checking intermittently if you are getting just enough tightness.
You will also need to shave the lens cap, the same distance that you have shaved the hood.

