Shopping Cart
0 item(s) - 0.00€Ultralight Panohead for Sigma 4.5mm f2.8 (+7.5°) Classic Design
*Delivery time estimate is for shipments within Germany. For other countries the delivery time will be different.
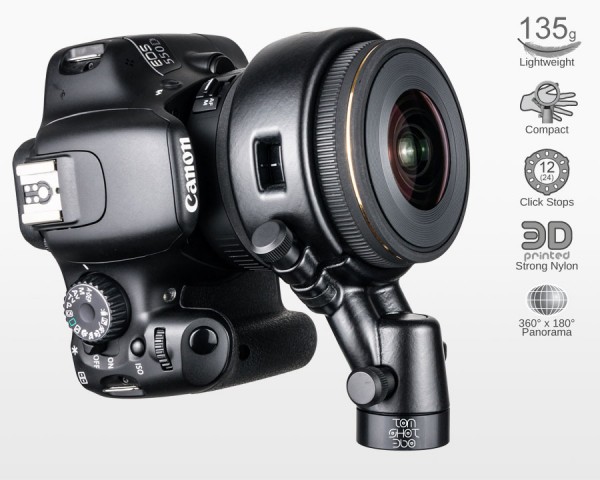
- Lightweight - ONLY 135 grams
- Compact - ONLY 140mm high
- Selectable click stops: 3, 4, 6, 8
- Free access to focus ring, adjustable
- Indicators for portrait and landscape orientations
- 3/8"-16 tripod thread, 1/4"-20 adapter included
- Ring is 3D printed with strong Polyamide nylon
- Rotator made from 6082-T6 aluminum
- Rotator lock (finger tight only)
- Circular Bubble Level
Updated with the new selectable 3, 4, 6, 8 click stops. Photos have not yet been updated.
The Ultralight Panohead is compact, lightweight, and easy to use for shooting 360° x 180° spherical panorama photos. Originally designed for extended hiking and bicycle trips, the new design with click stops is adaptable for use in multiple scenarios.
This version is for the Sigma 4.5mm f2.8 Circular Fisheye Lens, and is compatible with all mount types, Canon EOS, Nikon, and Sigma mounts. A panorama can be completed in 3 shots around and 1 optional hand nadir shot with an APS-C camera.
| APS-C sensor (1.5x and 1.6x crop factor) requires 3 shots around (4 recommended) and an optional hand nadir shot. The zenith is completely captured. There is a small nadir hole. The image is a completely inscribed circle. | Full Frame sensor (1x crop factor) is not recommended because of the small sensor coverage. |
| APS-C | |
|---|---|
| Shots Required | 3 + 1 |
| Nadir | Optional |
| Zenith | Not Needed, Captured |
| Image Resolution | 18mp: 5700 x 2850 |
| Sensor Coverage | Circle, completely inscribed |
| Lens Orientation | Portrait or Landscape |
| Lens Mount Type | Canon EOS Nikon Sigma |
| Notes | Remove the lens hood |
| Clicks: The rotator has selectable clicks of 3, 4 (default), 6, or 8 stops. Please refer to the instruction manual on how to change to a different number of stops. | Aperture: The Sigma 4mm f2.8 Circular Fisheye Lens is sharp between f8 - f11. Below f8 it tends to have softer edges and stich seams. This can be compensated if more shots are taken, which is why 4 shots are recommended. A useful feature of the Ultralight Panohead is that the focus ring is free to adjust while the lens is still attached. | Rotator Lock: When shooting 360 videos or time lapse, unintended rotation can be prevented by using the rotator lock. It is designed to only resist the weight of the camera against gravity. It is not intended to resist rotation by force. Finger tight only; do not overtighten the screw or attempt to rotate while locked, or damage may occur. |
| Control Points & Lens Shift: During stitching, your software may create control points which could cause misalignment. There should only be control points between adjacent images. For example, image 3 should only have points with 2 and 4. If 3 and 5 have control points, delete them. Also, for a better stitch, the software optimizer should aways be set to "Heavy Lens Shift." (Software is not included) | HDR & Exposure Fusion: When shooting scenes with a wide dynamic range between shadows and highlights, multiple exposures can help create a more evenly exposed shot. This would require the use of a tripod, and it is recommended to use a shutter release or remote control to prevent moving the camera during shooting. Cameras with Auto Exposure Bracketing (AEB) is a helpful feature. Always shoot in full manual mode and manual white balance, and optionally shoot in RAW format for better image quality. | Mobility & Monopods: Shoot with a monopod for quick and easy panoramas. Single exposure is only possible, but usually this would be taken outdoor where the lighting is more even. If it is dark, you can increase ISO, as long as you are able to shoot faster than 1/30 to 1/60 seconds. To keep the lens as close to the nodal point as possible, look at the built in bubble level, or use the Manfrotto Autopole Spirit Level which can be attached directly to the monopod (not included). |
| APS-C | Full Frame |
|---|---|
| Canon EOS, Nikon, Sigma Compatible with all models, no known incompatability | Canon EOS, Nikon, Sigma no known incompatability, not recommended because of small sensor coverage |
The upper part of the panohead, is printed with Selective Laser Sintering (SLS), which is a method of producing a physical duplicate of a 3D model by using a laser to fuse together particles of powder. The material used for the Ultralight Panohead is a strong Polyamide 12 nylon (PA2200 Material Data Sheet).
When it comes out from the machine, the surface is white and has a rough feel, because the nylon particles are about 60 microns. The parts are then placed in a tumbler with ceramic media for several hours until they are smooth. It is then colored in a vat of black dye for an hour. Afterwards, a layer of 2 component polyurethane clear coat is applied.


